Creating an Apex Rest API and using it as a custom tool in custom mcp server
🛠 Prerequisites
- A Salesforce Account (Developer Edition or Sandbox recommended).
- Postman installed on your machine.
- Basic understanding of REST APIs.
Here is an end-to-end implementation that:
✅ Exposes a Salesforce custom REST API that returns object field metadata
✅ Calls it from your custom MCP stdio server (Node.js)
✅ Makes it available to Copilot Agent
This solution uses Apex REST for object describe and jsforce in your MCP server to authenticate & fetch the results.
1) Apex REST Endpoint (Salesforce)
Create this Apex class in your Salesforce org. It returns a list of field metadata (name, label, type) for any object.
Save as ObjectFieldsController.cls:
ObjectFieldsController.cls@RestResource(urlMapping='/ObjectFields/*') global with sharing class ObjectFieldsController { global class FieldInfo { public String name; public String label; public String type; } @HttpGet global static List<FieldInfo> getObjectFields() { String sObjectName = RestContext.request.requestURI.substring( RestContext.request.requestURI.lastIndexOf('/') + 1 ); if (String.isBlank(sObjectName)) { return new List<FieldInfo>(); } Map<String, Schema.SObjectField> fieldMap = Schema.getGlobalDescribe().get(sObjectName).getDescribe().fields.getMap(); List<FieldInfo> output = new List<FieldInfo>(); for (String key : fieldMap.keySet()) { Schema.DescribeFieldResult d = fieldMap.get(key).getDescribe(); FieldInfo info = new FieldInfo(); info.name = d.getName(); info.label = d.getLabel(); info.type = String.valueOf(d.getType()); output.add(info); } return output; } }
This returns an array of simple objects with field name, label, and type. Apex REST requires a concrete return type (not Object) so we define FieldInfo.
2) MCP Server (Node.js)
This is your MCP stdio server that Copilot can call.
Install Required Packages:
npm install mcp-use jsforce
server.js#!/usr/bin/env node
import { createMCPServer } from "mcp-use/server";
import jsforce from "jsforce";

// Salesforce connection info — set via environment variables
const {
  SF_LOGIN_URL,
  SF_USERNAME,
  SF_PASSWORD,
  SF_CLIENT_ID,
  SF_CLIENT_SECRET,
  SF_REFRESH_TOKEN
} = process.env;

// Define your custom tool
const tools = {
  getObjectFields: async ({ input }) => {
    try {
      const { objectName } = input;
      if (!objectName) {
        return {
          result: { error: "Input must include objectName" }
        };
      }

      const conn = new jsforce.Connection({
        loginUrl: SF_LOGIN_URL || "https://login.salesforce.com",
        clientId: SF_CLIENT_ID,
        clientSecret: SF_CLIENT_SECRET,
        refreshToken: SF_REFRESH_TOKEN
      });

      if (SF_REFRESH_TOKEN) {
        await conn.refreshToken(SF_REFRESH_TOKEN);
      } else {
        await conn.login(SF_USERNAME, SF_PASSWORD);
      }

      const result = await conn.apex.get(
        `/ObjectFields/${encodeURIComponent(objectName)}`
      );

      if (!Array.isArray(result)) {
        return {
          result: { error: "Unexpected response format from Salesforce" }
        };
      }

      const summary = `Object ${objectName} has ${result.length} fields: ` +
        result.map(f => `${f.name} (${f.type})`).join(", ");

      return {
        result: {
          text: summary,
          fields: result
        }
      };
    } catch (err) {
      return {
        result: {
          error: err.message
        }
      };
    }
  }
};

// Start stdio MCP server
createMCPServer({ tools });
// keep alive
setInterval(() => {}, 1e9);
3) Create a Connected App (Now External Client App) in Salesforce
This acts as the doorway for Postman to enter Salesforce.
-
Log in to Salesforce Setup (gear icon → Setup).
-
In Quick Find, search for App Manager.
-
Click New External Client App (top-right).
-
Fill in:
-
External Client App Name
-
API Name
-
Contact Email
-
-
Check Enable OAuth Settings.
- Set Callback URL (Use the standard Postman callback)
https://oauth.pstmn.io/v1/callback
-
In Selected OAuth Scopes, add:
-
Access and manage your data (api)
-
Perform requests on your behalf at any time (refresh_token, offline_access)
-
These scopes let your app call Salesforce APIs and get a refresh token.
-
Save the external client app and wait ~10 minutes for it to fully propagate.
-
Once saved, open the app’s detail page.
-
Get SF_CLIENT_ID and SF_CLIENT_SECRET
On your external client app’s detail screen:
-
Consumer Key → this is your SF_CLIENT_ID
-
Consumer Secret → this is your SF_CLIENT_SECRET
Salesforce labels them Consumer Key and Consumer Secret respectively.
4) Set Environment Variables
Store your Salesforce credentials securely in .env file at the Home folder root and in user settings:
| Env Var | Description |
|---|---|
SF_LOGIN_URL | https://login.salesforce.com |
SF_USERNAME | your Salesforce username |
SF_PASSWORD | password + security token |
SF_CLIENT_ID | External client App Consumer Key |
SF_CLIENT_SECRET | External client App Secret |
SF_REFRESH_TOKEN | refresh token (recommended) |
5) Setup Postman Settings
-
In Postman, create a new http request.
-
Go to the Authorization tab.
-
Make sure no collection is selected in collections tab.
If you run OAuth from within a collection that has its own Auth settings:
-
Postman may reuse or override tokens.
-
It may try to use a stored callback URI and can lead to redirect mismatch or token assignment errors.
Option A — No Collection
-
Don’t save the request in a collection.
-
In Postman, leave the Collections panel unselected and run the request standalone.
Option B — Request-level Auth Only
-
If you must save the request in a collection:
-
Make sure Authorization Type = OAuth2.0 is set only at the request level and not at the collection level.
-
Select OAuth 2.0 → Get New Access Token.
-
Fill in:
-
Token Name: Personal API
-
Grant Type: Authorization Code(With PKCE)
-
Callback URL: Same as in your external client app or use Authorize using browser
-
Auth URL: https://login.salesforce.com/services/oauth2/authorize
-
Access Token URL: https://login.salesforce.com/services/oauth2/token
-
Client ID: your Consumer Key
-
Client Secret: your Consumer Secret
-
Code Challenge Method: SHA-256
-
Scope: api refresh_token offline_access
-
6) Generating the Tokens
-
Click Get New Access Token.
-
Log in and authorize.
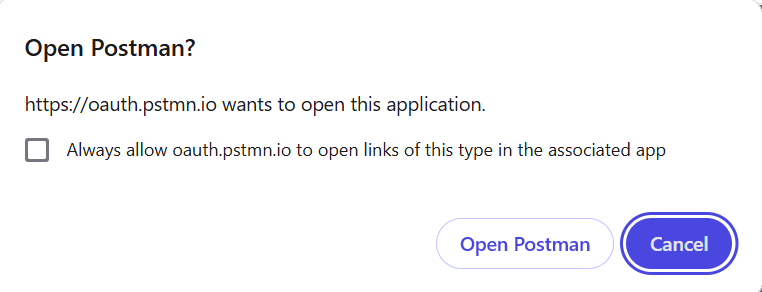
- Click on Open Postman Option and make sure that your browser allow pop-ups.
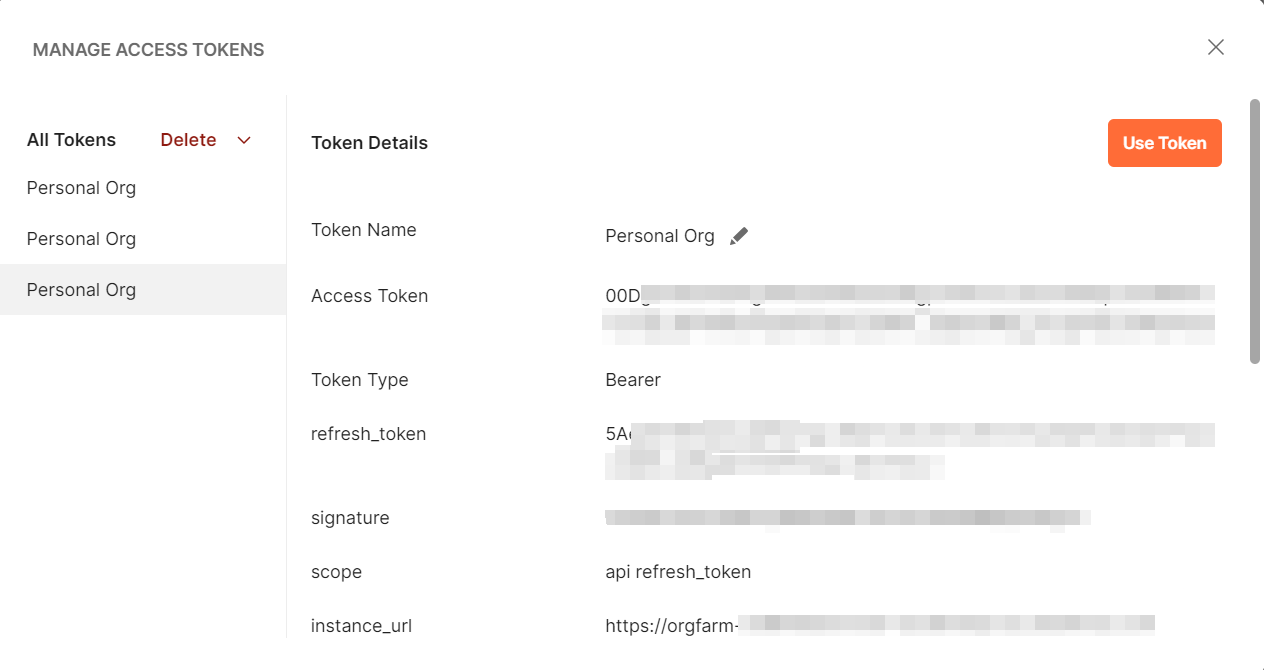
Copy the refresh_token from here and store it in .env as well as in the user settings (if you configured it).
This method uses Salesforce’s OAuth and gives you both tokens (access and refresh) in a GUI.
Postman can now use the refresh_token to automatically fetch a new access_token when the old one expires, preventing the need to log in again manually
7) Update .vscode/mcp.json
mcp.json{
  "servers": {
    "Custom MCP": {
      "type": "stdio",
      "command": "node",
      "args": ["server.js"],
      "cwd": "${workspaceFolder}/my-mcp-server"
    }
  }
}
✔ Copilot/Agentforce will spawn your custom MCP server via stdio
✔ Ensure you restart VS Code after saving this
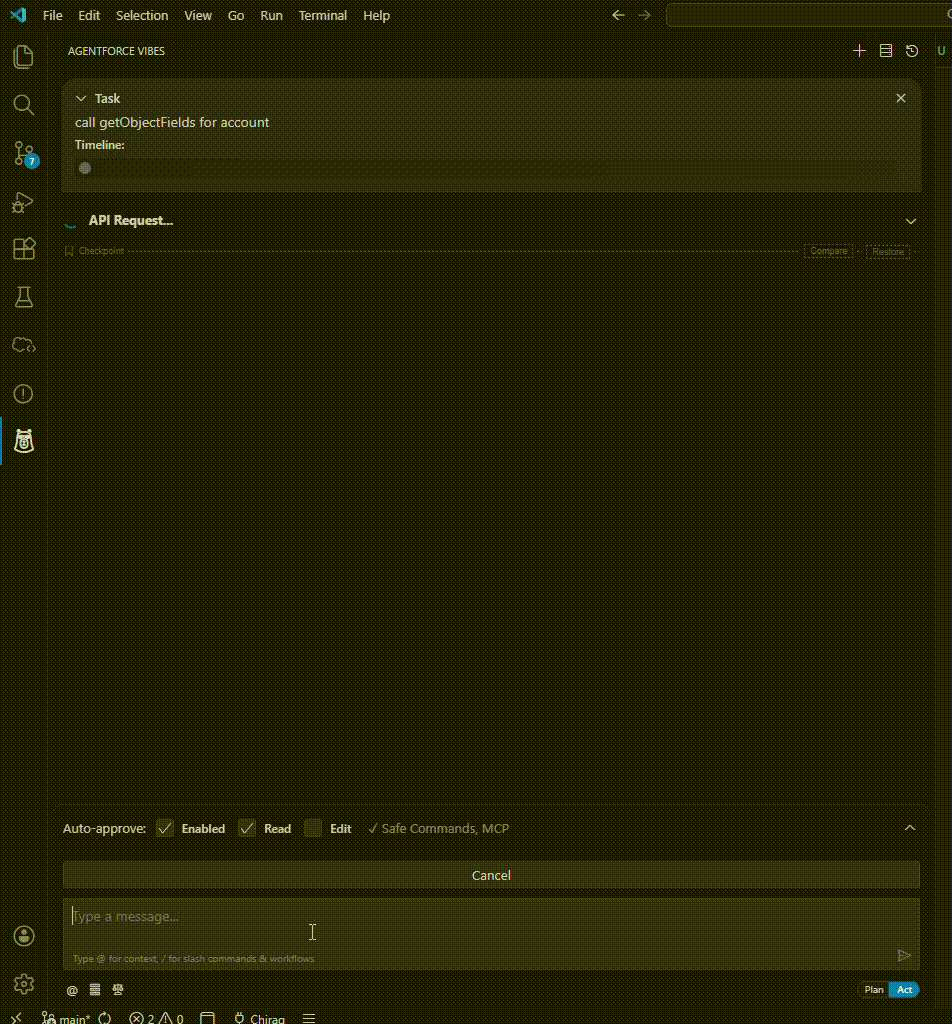
8) Execute this command in Copilot/Agentforce to test the API
Call the tool getObjectFields for Account
🎉 Result
You now have a fully working custom Salesforce API + MCP tool that:
✨ Calls an Apex REST endpoint
✨ Returns Salesforce field metadata
✨ Responds in natural language via Copilot/Agentforce